
This is a short recipe to get a sample pen-test lab up and running. Will sort out the timings.
Prep work
Est. time: ~40mns, mainly spent waiting for things to download.
- Install VMWare Player (< 5mns)
- Download the latest version of VMWare Workstation Player - 12.1 as of now
- Install the package
- Create a directory call
pentestlabs - Download the target system
- Download the De-ICE iso and the associated vmx file. Make sure both are in the same directory (
pentestlabs) Note: thevmxfile is plaintext, and contains instructions likememsize = "256". You can use that to customise the VM directly
- Download the De-ICE iso and the associated vmx file. Make sure both are in the same directory (
- Download the attack system (the one you’ll be using to launch an attack from) (<
- Download the latest version of Kali Linux Light (you can download the full version too if you prefer)
- Verify the SHA1 sum of the iso (which should be
fc54f0b4b48ded247e5549d9dd9ee5f1465f24abif using the link above but don’t take my word for it - check the site itself). If you’re using Windows, you’ll need to download the FCIV utility. You can then check the SHA1 sum via:
c:\bin\fciv>fciv -sha1 c:\downloads\kali-linux-light-2.0-amd64.iso // // File Checksum Integrity Verifier version 2.05. // fc54f0b4b48ded247e5549d9dd9ee5f1465f24ab c:\downloads\kali-linux-light-2.0-amd64.iso- Download this vmx file
- Add the VMWare network manager tool
- Download VMWare Workstation Pro. Select ‘Get Free Trial’
- Start the install and enable logging
U:\tmp>VMware-workstation-full-12.1.0-3272444.exe /l c:\vmww12.log- The installation process will be initiated. You don’t need to complete it - just take a look at the log file (
c:\vmww12.log) and search for a line similar to:
MSI (c) (90:4C) [20:14:55:313]: Original package ==> C:\Program Files (x86)\Common Files\VMware\InstallerCache\{0AD91785-F9BD-47FD-84F7-9E27B5A1853D}.msi- Grab the path and run this through
msiexec, which should be installed on your machine by default
U:\tmp>msiexec /a "C:\Program Files (x86)\Common Files\VMware\InstallerCache\{0AD91785-F9BD-47FD-84F7-9E27B5A1853D}.msi" /qn TARGETDIR=u:\tmp\vmw- And copy
U:\tmp\vmw\VMware\VMware Workstation\vmnetcfg.exeto your VMWare player’s directory (where all the files are loacted) - Cancel the install)
Let’s get cookin’
Est. time: ~10mns
By now you should essentially have 2 ISO files, and 2 vmx files. The only thing missing is to set up the network. For safety purposes, we’ll have the VMs on a host-only network. This means they won’t be able to talk to the outside (which is probably a good thing).
Run the vmnetcfg.exe file present in the VMWare folder. Make sure you have a VMnet network set up. If not, click on Add Network and select ‘Host-only’.
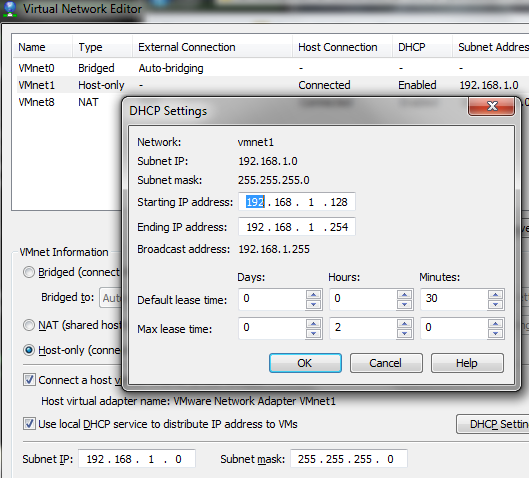
Set the DHCP settings as per the below (so automatic assignment will only start from .128 onwards)
Edit each vmx file and append this so the VMs use the network we just defined:
ethernet0.vnet = "VMnet1"
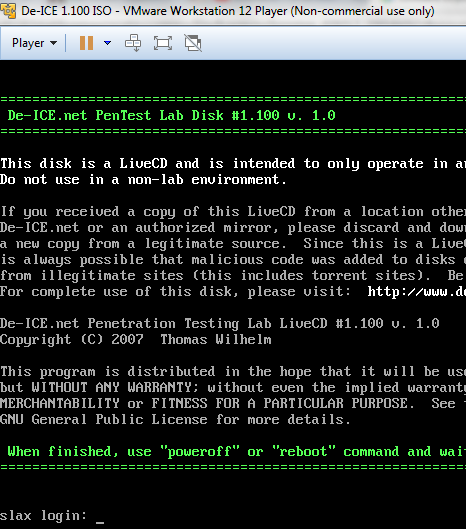
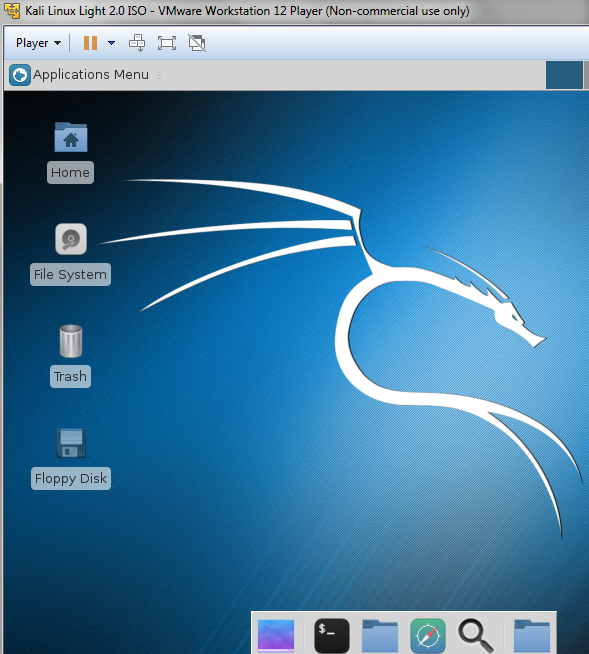
You can then double-click on De-ICE_S1.100.vmx to start the target system. Follow this by kali-linux-light-2.0.vmx. You should now have 2 systems up and running. De-ICE:
And Kali:
A small warning: both systems are set up as live-only. This means that when you shut everything down, state will not be saved. If you need state saved, you’ll need to use VMWare’s snapshot feature.
To verify it all works, log in to Kali (u:root p:toor) and look for the De-ICE VM via nmap 192.168.1.0/24. You’ll likely find other (VMWare) systems like the DHCP server, but this one should be fairly easy to identify (hint: it has imap running).
All done!